TABLES
TABLES
IMAGEMAP
- MAKING
MAPS
- LINKING
- CONFIGURING IMAGEMAP
- CLIENT-SIDW IMAGEMAPPING
FRAMES
FORMS
- HTML
- PARSING THE
RETURN
- OUTPUT TO THE USER
- MAKING YOUR SCRIPT DO
THINGS
SECURITY
Tables
Tables make it easy for you to put your
spreadsheets and data
out on the web.
Tables are created with the
following tags:
- <TABLE> - Use this
tag to start a table. This tag must be closed after the table, with
</TABLE>. You can also put a border around your table by adding the word
BORDER to your opening TABLE tag.
- <CAPTION> - Use this tag
to give a title to the table. This can be given an ALIGN=BOTTOM to put
the caption after the table. This tag must be closed after the caption
is done.
- <TR> - This is the tag that
starts the rows of the table. This needs to be closed after every row,
and opened before every row of the
table.
- <TH> - This is the first cell tag,
this marks a header cell. The data in this cell will be centered and
bold-faced automatically.
- <TD> - This is
the tag that marks a standard data cell, this type of cell is the one
that most of your data will go into.
Alignment Within A
Table
The tags <TR>, <TH> and <TD> take
alignment attributes inside their tags. These attributes
are:
- ALIGN={LEFT, RIGHT, CENTER} - This
will set the horizontal alignment of a row or
cell.
- VALIGN={TOP, MIDDLE, BOTTOM} - This will
set the vertical alignment of a row or
cell.
- COLSPAN=X - This is the number of
columns in width the cell will be.
- ROWSPAN=Y
- This is the number of rows high the cell will
be.
- NOWRAP - This will turn the word-wrapping
off within cells, therefore the cell will not move text depending on
the screen size
Example Table
- This is the caption
| This is row1
with a header |
Cell 2 |
Cell 3 |
| This is Row 2 |
Cell 2 Row 2 |
Cell 3 Row
2 |
| This is row 3. Notice that the table
will try to fit all the text and will resize. |
Cell
2 |
Cell 3 |
Frames
Frames extend the layout flexibility of web pages by allowing the visible
client area to be divided into more than one sub-region. Each sub-region,
or frame, has several properties:
- It can load its own URL, independently of the other frames.
- It can be given a NAME, allowing it to be targeted by other URL's
- It resizes itself dynamically in response to changes in the size of
the visible client area, and it can choose to allow or disallow itself
to be manually resized by the user.
These properties enable a number of new scenarios:
- Information that the page designer wishes to remain constant and visible,
such as Toolbar-like UI, Confidentiality messages, Title graphics, can
be put on a frame separate from the rest of the site. As the user moves
through the site in the "live" frame, the "static" frame is always visible,
with no redraw.
- Table of Contents scenarios become much clearer. A "left" frame could
contain a set of links, each of which when clicked targets its results
into the "right" frame.
- A "query" frame could contain form HTML for the submission of database
queries, while a "results" frame could receive the results of each query.
The best way to grok the potential and reality of Frames is to see some
examples. Links to good frame implementations can be found on Netscape's
online Hall of Frame (in progress).
Frames will be submitted shortly to the Internet Engineering Task Force
and World Wide Web Consortium for consideration as Internet standards.
Frames - Syntax
Frames are generated by three things: FRAMESET tags,
FRAME tags, and Frame Documents.
Frame Document
A Frame Document has a basic structure very much like your normal
HTML document, except the BODY container is replaced by a
FRAMESET container which describes the sub-HTML documents, or Frames,
that will make up the page.
<HTML>

<HEAD>

</HEAD>

<FRAMESET>

</FRAMESET>

</HTML>
Frame Syntax
Frame syntax is similar in scope and complexity to that used by tables,
and has been designed to be quickly processed by Internet client layout engines.
<FRAMESET>
- This is the main container for a Frame. It has 2 attributes
ROWS and COLS. A frame document has no BODY, and no tags that
would normally be placed in the BODY can appear before the FRAMESET tag,
or the FRAMESET will be ignored. The FRAMESET tag has a matching end tag,
and within the FRAMESET you can only have other nested FRAMESET tags, FRAME
tags, or the NOFRAMES tag.
- ROWS="row_height_value_list"
- The ROWS attribute takes as its value a comma separated list of values.
These values can be absolute pixel values, percentage values between 1 and
100, or relative scaling values. The number of rows is implicit in the number
of elements in the list. Since the total height of all the rows must equal
the height of the window, row heights might be normalized to achieve this.
A missing ROWS attribute is interpreted as a single row arbitrarily sized
to fit.
-
- Syntax of value list.
- value
- A simple numeric value is assumed to be a fixed size in pixels. This
is the most dangerous type of value to use since the size of the viewer's
window can and does vary substantially. If fixed pixel values are used, it
will almost certainly be necessary to mix them with one or more of the relative
size values described below. Otherwise the client engine will likely override
your specified pixel value to ensure that the total proportions of the frame
are 100% of the width and height of the user's window.
- value%
- This is a simple percentage value between 1 and 100. If the total is
greater than 100 all percentages are scaled down. If the total is less than
100, and relative-sized frames exist, extra space will be given to
them. If there are no relative-sized frames, all percentages will be scaled
up to match a total of 100%.
- value*
- The value on this field is optional. A single '*' character is a
"relative-sized" frame and is interpreted as a request to give the frame
all remaining space. If there exist multiple relative-sized frames, the remaining
space is divided evenly among them. If there is a value in front of the '*',
that frame gets that much more relative space. "2*,*" would give 2/3 of the
space to the first frame, and 1/3 to the second.
-
- Example for 3 rows, the first and the last being smaller than the
center row:
<FRAMESET ROWS="20%,60%,20%">
Example
for 3 rows, the first and the last being fixed height, with the remaining
space assigned to the middle row:
<FRAMESET
ROWS="100,*,100">
- COLS="column_width_list"
- The COLS attribute takes as its value a comma separated list of values
that is of the exact same syntax as the list described above for the
ROWS attribute.
The FRAMESET tag can be nested inside other FRAMESET tags.
In this case the complete subframe is placed in the space that would be used
for the corresponding frame if this had been a FRAME tag instead of a nested
FRAMESET.
-
- <FRAME>
- This tag defines a single frame in a frameset. It has 6 possible attributes:
SRC, NAME, MARGINWIDTH, MARGINHEIGHT,
SCROLLING, and NORESIZE. The FRAME tag is not a container so
it has no matching end tag.
-
- SRC="url"
- The SRC attribute takes as its value the URL of the document to be displayed
in this particular frame. FRAMEs without SRC attributes are displayed as
a blank space the size the frame would have been.
- NAME="window_name"
- The NAME attribute is used to assign a name to a frame so it can be targeted
by links in other documents (These are usually from other frames in the same
document.) The NAME attribute is optional; by default all windows are unnamed.
-
- Names must begin with an alphanumeric character. However, several reserved
names have been defined, which start with an underscore. These are currently:
-
- _blank --> Always load this link into a new, unnamed window.
- _self --> Always load this link over yourself.
- _parent --> Always load this link over your parent.
(becomes self if
- you have no parent).
- _top --> Always load this link at the top level.
(becomes self if
- you are at the top).
-
- All other names starting with '_' will be ignored.
- MARGINWIDTH="value"
- The MARGINWIDTH attribute is used when the document author wants some
control of the margins for this frame. If specified, the value for
MARGINWIDTH is in pixels. Margins can not be less than one-so that frame
objects will not touch frame edges-and can not be specified so that there
is no space for the document contents. The MARGINWIDTH attribute is optional;
by default, all frames default to letting the browser decide on an appropriate
margin width.
- MARGINHEIGHT="value"
- The MARGINHEIGHT attribute is just like MARGINWIDTH above, except it
controls the upper an lower margins instead of the left and right margins.
- SCROLLING="yes|no|auto"
- The SCROLLING attribute is used to describe if the frame should have
a scrollbar or not. Yes results in scrollbars always being visible
on that frame. No results in scrollbars never being visible.
Auto instructs the browser to decide whether scrollbars are needed,
and place them where necessary. The SCROLLING attribute is optional; the
default value is auto.
- NORESIZE
- The NORESIZE attribute has no value. It is a flag that indicates that
the frame is not resizable by the user. Users typically resize frames by
dragging a frame edge to a new position. Note that if any frame adjacent to
an edge is not resizable, that entire edge will be restricted from moving.
This will effect the resizability of other frames.The NORESIZE attribute
is optional; by default all frames are resizable.
-
- <NOFRAMES>
- This tag is for content providers who want to create alternative content
that is viewable by non-Frame-capable clients. A Frame-capable Internet client
ignores all tags and data between start and end NOFRAMES tags.
Imagemaps
There are two kinds of imagemaps currently on the WWW, We will cover both here today.
The first is the server side imagemaps, these will run on all clients, but are slightly slower
the the client-side imagemaps which only work in browsers with client-side imagemapping.
Server-side Imagemaps
Imagemaps
make images active, allowing users to link to different places within
an image.
Making Map Files -
The first part of making map
files involves choosing the sections of the image that will go to
different links. Once you know where your links are going to go you
need to create a map file. (This is the style of map file for NCSA
Imagemap.)
The map file is rather basic and is set up as
follows:
- The default URL should be the first thing in the
map file. This is the URL that the image will link to if the user
clicks on a space not defined by the sections of the map
file.
This should be in the form default
http://directory/filename
- The rest of the document should
be made up of the mapped sections of the image. You may map images in
three ways:
- Rectangle - is the easiest type to map. For
this type you need to add the coordinates for two opposite corners of
the rectangle. It is put in the map file in the form: rect URL x,y
x,y (where the x and y are the coordinates marking the upper
right corner as 0,0). The URL is the place where this section of your
document will link.
- Circle -for circles you use almost the same
format, as rectangles, except that the coordinates are the center and a
point on the outside of the circle. This looks like: circle URL
x,y x,y The coordinates and URL are set up the same as the
Rectangle.
- Polygon - the polygon is a figure with unlimited
sides and is useful for areas of an image that are not computer
generated. The polygon has more coordinates than the other two because
it can have more sides. The coordinates are every corner in the
object. All the consecutive corners have lines drawn between them to
mark the border.
The form for this is: poly URL x,y x,y x,y x,y
x,y. The final coordinate is automatically connected to the first
one.
Simple Map File
Example
More Complex Map
Files
- After putting all these things into your map file, you
should save it to a place on your server where you know the full
pathname. You will need the full pathname for the file in the next
part where you add it to your configuration files. Save the mapfile
with a .map extension so that everything knows what it is.
Making the Link
- The link is the next part of
the imagemap. Within your HTML document you need to make your image a
link. This link should follow this form:
<A HREF =
"http://Servername/cgi-bin/imagemap/pathname-for-image"><img
src="Image_URL" ISMAP></a>.
- Notice the ISMAP in the IMG SRC tag, this tells the
client software to send the mouse click coordinates.
Working
with NCSA Imagemap
Example Configuration File
Client-Side Imagemapping
The Link
- Adding a
USEMAP attribute to an
IMG element indicates that it is a client-side image map.
- The
USEMAP attribute can be used with the ISMAP attribute
to indicate that the the image can be processed as either a client-side or
server-side image map.
- The argument to
USEMAP specifies which
map to use with the image, in a format similar to the HREF attribute
on anchors.
- If the argument to
USEMAP starts with a '#', it
is assumed to be in the same document as the IMG tag.
- A few
examples would be:
You can only click here if your browser supports client-side image
maps:

<IMG SRC="../images/tech/pic1.gif"
USEMAP="maps.html#map1">
- This image map will work regardless:
<A HREF="/cgi-bin/image
map/pic2"> <IMG SRC="../images/tech/pic2.gif" USEMAP="maps.html#map2"
ISMAP></A>
- Clicking here will take you to a page with an error message if you don't
have client-side image map support:
<A HREF="no_csim.html">
<IMG SRC="../images/tech/pic3.gif" USEMAP="maps.html#map3">
</A>
The Map
- The different regions of the image are described using a
MAP
element.
- The map describes each region in the image and indicates where it
links to.
- The basic format for the
MAP element is as follows:
<MAP NAME="name">
<AREA
[SHAPE="shape"]
COORDS="x,y,..."
[HREF="reference"] [NOHREF]>
</MAP>
- The name specifies the name of the map so that it can be referenced
by an
IMG element.
- The shape gives the shape of this area. Currently the only shape defined is "
RECT", but the syntax
is defined in such a way to allow other region types to be added.
- If the
SHAPE tag is omitted, SHAPE="RECT" is assumed.
- The
COORDS tag gives the coordinates of the shape, using image
pixels as the units. For a rectangle, the coordinates are given as
"left,top,right,bottom".
- The
NOHREF tag indicates that clicks in this region should
perform no action.
- An
HREF tag specifies where a click in that
area should lead. (Note that a relative anchor specification will be expanded
using the URL of the map description as a base, rather than using the URL
of the document from which the map description is referenced.
- If a
BASE tag is present in the document containing the map description,
that URL will be used as the base.
- An arbitrary number of
AREA tags may be specified. If two
areas intersect, the one which appears first in the map definition takes
precedence in the overlapping region.
- For example, a button bar in a document
might use a 160 pixel by 60 pixel image and appear like this:
<MAP NAME="buttonbar">
<AREA SHAPE="RECT" COORDS="10,10,49,49" HREF="about_us.html">
<AREA SHAPE="RECT" COORDS="60,10,99,49" HREF="products.html">
<AREA SHAPE="RECT" COORDS="110,10,149,49" HREF="index.html">
<AREA SHAPE="RECT" COORDS="0,0,159,59" NOHREF>
</MAP>
<IMG SRC="../images/tech/bar.gif" USEMAP="#buttonbar">
- This example includes a region encompassing the entire image with a
NOHREF tag, but this is actually redundant. Any region of the image that is not defined by an AREA tag is assumed to be NOHREF.
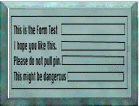 Forms
Forms
The HTML Parts
of the Form
Forms allow the user to input data directly into the
server. This allows the user to interact with databases, or to send
e-mail from the web. These are the HTML parts that create the front
end of the form:
- <form> - This is the tag that is
required to begin a form, and you must end the form with </form>
tag. The opening tag should also contain the method, and action for
the form. The method should always be POST at this time. The action
should be the URL for the program the form will be running
with.
- <input> - The input tag is a very common tag
because it allows most different types of input through your forms.
These are designated by certain attributes within the tag.
- The first of these parts is the type, which can
be:
- type="text" - This is pretty straight forward, the box
will accept single lines of text, as the input type.
- type =
"password" - This will also accept a single line of text, but in stead
of seeing the text, most browsers will cover this with something like
*.
- type="checkbox" - This is the form of input that allows a box
that can be either turned on or off, but doesn't allow anything
else.
- type="radio" - This is similar to the checkbox except that
this will be exclusive when checked, no other radio inputs with the
same variable name will be allowed to be checked. This is used for
exclusive fields like male or female.
- type="submit" - This will
create a button that submits the data to the server.
- type="reset" -
This will create a button that will reset all the values in the form to
their defaults.
- Name="textstring" - The next part of
the input tag is the name. The name is a text string which names the
variable being input by the form. This is added as name="variable
name".
- Value ="textstring" - The next part is called value.
For text and password inputs this will be the default text in the box.
For checkbox and radio inputs this will be the value sent to the server
by the form, when the box is checked. For submit and reset inputs this
is the value shown on the button. The form for this part of the tag is
value="textstring".
- checked - The next part of the tag
is checked. This will make a checkbox or radio field default as
checked.
- Size = X - The next part of the tag is size. This is
the length in columns that the box is for text, and password
inputs.
-
The final part of the input tag is maxlength. This is
the maximum length of the input for text, or password fields.
- <select> - This is a tag that allows you to do multiple
option lists within your form. The select tag need to be started and
closed. Within it you mark each possible option with the option tag.
The select tag also needs to be closed after all the options are added.
The parts of the select tag are:
- name - this is the
variable name sent to the server.
- size - This the
number of options that are shown for this
tag.
- multiple - This allows the form to accept
multiple selections for the select
tag.
- <option> - The option tag marks the
possibile options within the select tag. The two types of option tags
are those that are not selected and those that are selected. They look
like <option> and <option selected>.
- <textarea> - The final tag for forms is the textarea. This
tag includes parts for name, which is the variable name for the area, a
value for rows, and one for columns (this is the size of the area).
The values are set using name="textstring", rows=x, and cols=x. To
have default text in the field you set this tag up with an open and
close, with the default text in the middle. Example: <textarea
...> ...default text... </textarea>
Examples of all the form
elements
Parsing What Comes In From A Form
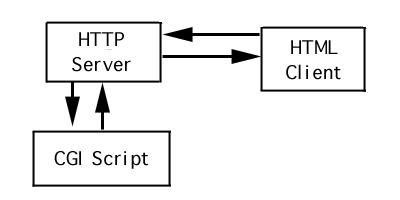
- The input from a form to your CGI
program is simple and straight forward.
- The browser will send
fields out in the order they are in your form and will replace spaces
and return characters with ASCII numbers.
- This information
will go into the "STDIN" for your cgi-bin program.
- The program
will need to split the input up into fields or an array depending on
how you program.
- The browser will send you your fields
separated by the & symbol and it will look like:
NAME=value&ADDRESS=value&....
where name and address are the names
of fields in your form. The value for each field is separated from the
input by an equals sign.
- In a long input field where spaces
are used these are replaced by either + signs, or %20(which is the
ASCII value for the space).
- In a textarea field the new line
characters are also replaced by ASCII. Many other parts of input will
be turned into ASCII so you may want to convert all of these in your
program.
Example of PERL Parsing
if ($rm !~ /POST/) {
        print "This script should be referenced with a METHOD of POST.\n";
        print "If you don't understand this, see:\n";
        print "<A HREF=>"http://www.ncsa.uiuc.edu/SDG/Software/Mosaic/Docs/fill-out-forms/overview.html\">forms overview</A>\n";
        exit;
}

$ct = $ENV{'CONTENT_TYPE'};
if ($ct !~ /application\/x\-www\-form\-urlencoded/) {
        print "This script can only be used to decode form results. \n";
        exit;
}

$cl = $ENV{'CONTENT_LENGTH'};
$Remote_Addr = $ENV{'REMOTE_ADDR'};
$Remote_Host = $ENV{'REMOTE_HOST'};
$Remote_Host = "" if ($Remote_Host == $Remote_Addr);
while () {
$read = $read + length($_);
$submission = $_;
last if ($read >= $cl);
}
print $submission;

#%21 is an exclamation point (!,bang) that escapes to the shell.
$submission =~ s/\!/\./g;
$submission =~ s/%21/\./g;

(@pairs) = split (/&/,$submission);
foreach $item (@pairs) {
	($heading,$value) = split (/=/,$item);
	$value =~ s/\+/ /g;
        $value =~ s/%(..)/pack("c",hex($1))/ge;
	$VALUE{$heading} = $value;
}
Output Back to the User
- The STOUT
from your program is what the user will get back when they input a
form.
- So if you want the user to get a form saying they have
sent information, you do that here.
- Also, if the user makes a
search using your program this can return a page that has links the
user can follow.
- This output needs to be in HTML because it
will be read by the client software.
PERL Output Example
printf("Content-type: text/html%c%c",10,10);
print "<HTML><HEAD><TITLE>SENT MESSAGE</TITLE></HEAD><BODY>";
print "<H2>The following message was sent to Douglas Fein</H2><HR><B>FROM:</B><DL><DT>$VALUE{'PERSONAL-NAME'}<DD>$VALUE{'STREET-ADDRESS'}";
print "<DD>$VALUE{'CITY'}  $VALUE{'STATE'} $VALUE{'ZIPCODE'}";
print "<DD>$VALUE{'COUNTRY'}<DD>$VALUE{'ORGANIZATION'}<DD>$VALUE{'RELATIONSHIP'}</DL>";
print "<h3>Subject:</h3>$SUBJECT\n";
print "<h3>Message:</H3>$CONTENT\n</BODY></HTML>";
print "<P><B>You will receive an electronic acknowledgment of
       receipt of this letter if you have provided a valid e-mail
       address.</b>";
Making Your Script Do
Things
- How your script does things depends on the
programing language you use.
- On the Macintosh you need to use
AppleScripts or something similar to make your program interact with
other programs on your server.
- On UNIX systems you may want to
read files and may need to make system commands to make your program
interact with the system programs.
- Beware that using a script
to run things on your server can become a security leak if you do not
watch things.
- Using PERL system commands you can send e-mail
or interact with a finger query, or database.
- You can even
edit files or change things, but this is dangerous for some types of
servers.
CGI Example 1
CGI Example 2
Security
Security
issues are many and these are some of the most common ones to look out
for:
- Authentication of users, and servers connecting to
your machines
- Privacy of requests and responses from your
server
- Abuse of server bugs
- Abuse of leaks made by forms,
or other server input types.
- Abuse of logging
information
These problems are common and can usually be
dealt with easily.

The National Center for Supercomputing Applications
University of Illinois at Urbana-Champaign
[email protected]
Last modified: June 19, 1997
|


